There’s a great big problem that road safety folk here in the UK are still grappling with: how to get drivers to pay attention before it’s too late.
One thing that’s been gaining traction is bump strips – those odd little bumps in the road that give you a bit of a vibration and a rattle when you cross them. They’re a pretty straightforward and cost effective way to make sure drivers stay alert, and this guide is going to cover all the key points for UK highways engineers, local authority bods, and transport planners to get up to speed on spec’ing, designing, and maintaining them.
Executive summary – the lowdown on bump strips for UK pros
Bump strips – also known as rumble strips or those odd, buzz-inducing markings on the road – are bits of the road that play a nasty vibration and ratty noise on your tyres when you drift out of your lane or near a hazard. They’re not speed humps or tables that’ll slow you down, they’re more a wake-up call for your nervous system, to get you to correct your steering and get back on track.
The case for bump strips is pretty convincing. Studies all around the world have shown that where they’ve been put in properly, you can see a 10-25% reduction in collisions – and sometimes even up to 40% for the really serious crashes. UK research has come out with the same message too – especially for those rural single carriageways where a lot of seriousness happens.
It’s worth noting that bump strips are pretty important not just for road safety, but also in industrial and manufacturing settings – they help keep people safe, stop accidents and make things run more smoothly. People are using them right across the country in all sorts of work environments with lots of foot traffic.
But bump strips ain’t all plain sailing. Noise complaints from nearby residents, safety worries for cyclists on really narrow bike lanes, and the problem of roads getting nipped and crunched up in the freeze-thaw cycle all need to be taken into account in UK contexts.
The quick and dirty version, for busy people:
- Shoulder and centreline bump strips can cut run-off-road and head-on collisions by 10-25% – with some studies showing up to 40% on really bad crashes.
- The most common use cases in the UK are on rural single carriageways, high-speed approaches to junctions and roundabouts, motorway shoulders, and temporary roadworks.
- Good points: super cheap, great return on investment for safety, and works day and night.
- Bad points: noise in residential areas, potential hazards for cyclists and motorbikers on really thin shoulders, and maintenance issues in our dodgy UK winters.
- They’re also used in loads of other industries and environments with lots of customer traffic, valued for being tough, eco-friendly and a doddle to fit in – which is how they manage to win over customers.
What sort of people is this article for? Well, this is written for UK highways folk, local authority techies, civil engineering contractors, transport planners and specifiers all alligned with the Department for Transport, TSRGD 2016, Traffic Signs Manual and DMRB stuff.
It also covers some of the newer, surface-mounted products (like these modular systems that mimic the old milled rumble strips).
The bottom line is, safety bump strips are a must-have for preventing accidents and crashes in road and industrial settings – their use all across different industries, and their effectiveness, make them really important for safety management.
What are bump strips? Definitions, jargon and UK context
When we talk about ‘bump strips’ in this article, we’re talking about road-based auditory-tactile markings – the ridged or grooved bits on the road that give you a rattle and a vibrate. This is different from industrial safety bumpers or warehouse bump rails that protect against crashes in loading areas.
UK technical guides have loads of different names for these road features – “rumble strips”, “rumble devices”, “auditory-tactile markings”, “vibraline”. All these terms describe the same family of road safety treatments – so while “bump strip” might be a bit more informal, you’ll see them all used in different pubs and guides.
The difference between longitudinal and transverse bump strips
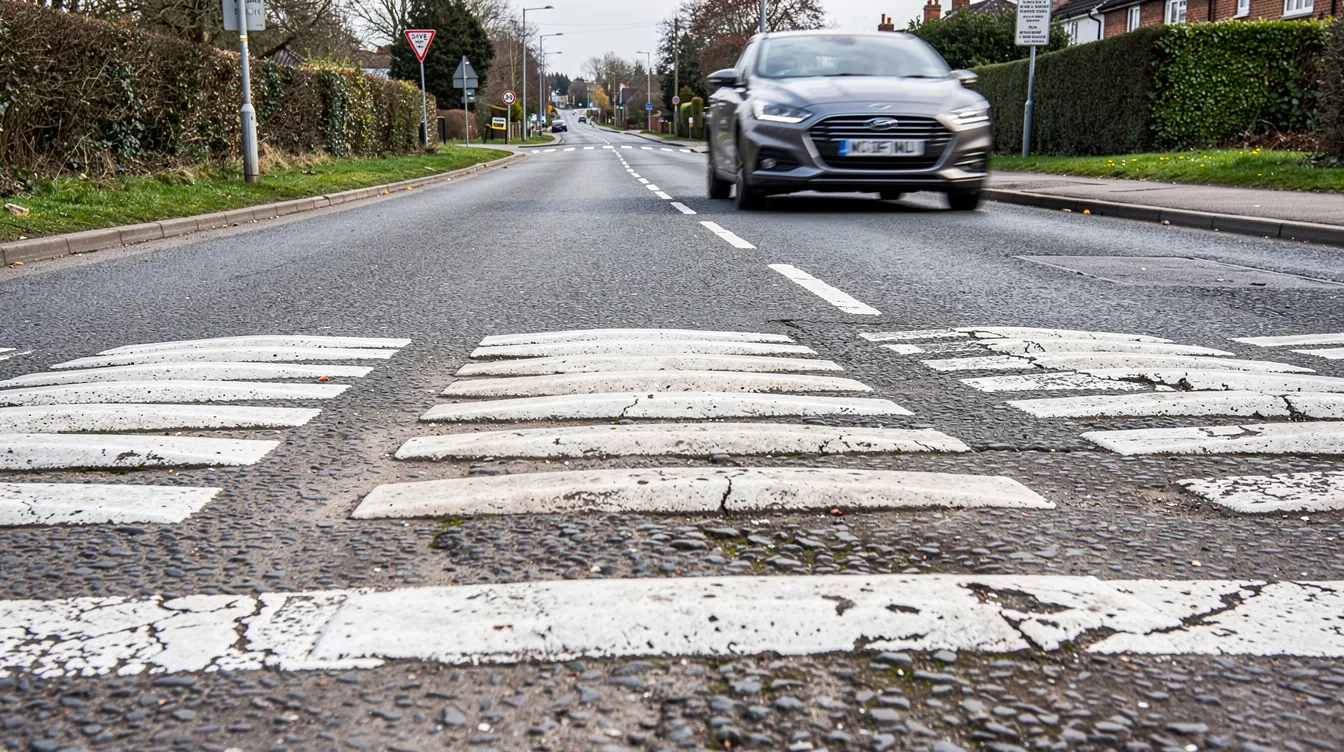
Longitudinal bump strips are installed along the direction of travel, which can be shoulder or roadside strips that warn you you’re about to drift towards the verge, or centreline strips on single roads that tell you you’re about to meet traffic coming from the other side. Raised pavements or curb edges can be a real hazard for vehicles, especially if you overreact or try to avoid them. Longitudinal bump strips help prevent this by giving you an early warning before you go too far. Like those milled grooves you see on motorway hard shoulders – those are longitudinal bump strips designed to stop you from going off the road.Transverse bump strips run across the carriageway width , and are typically installed in a series right up to hazards. If a driver’s approaching a roundabout at 60mph they might well encounter three to six transverse bars with decreasing spacing – that’s a rising sense of tactile and auditory warning that something’s up before you even reach the junction. They’re commonly found at village gateways, sharp bends, and temporary road works.
How bump strips differ from other road safety treatments
Bump strips shouldn’t be confused with speed humps, tables or cushions. Those vertical deflection devices physically slow you down because drivers have to reduce speed to avoid being jarred about or damaging their vehicle. Bump strips on the other hand alert you, without forcing you to slow down – a tired driver who drifts onto a shoulder bump strip gets a wake-up call, but still has full control over their speed.
In much the same way, just having painted road markings gives you visual cues, but bump strips add that vital tactile and auditory dimension that can get through to drivers even if visual cues fail to grab your attention – in the dark, through fog/heavy rain, or when you do take your eyes off the road for a second.
UK historical context
Bump strips first started appearing on UK motorways and dual carriageways from the late 90s and early 2000s, following evidence from the States that showed a significant reduction in road crashes. The Highways Agency (which is now National Highways) adopted continuous milled shoulder strips as standard practice on many strategic routes. TRL’s 2019 “Safer Verges” report then suggested we should extend their use onto rural single carriageways, where there are a lot of run-off-road and head-on crashes which cause a lot of serious injuries.
Outside the public highway network, bump strips are becoming increasingly popular in retail parks, logistics yards and private estates. Surface-mounted modular units, which you can just fix on the existing surface without having to mill it, offer a useful alternative when permanent installation isn’t an option – or when it’s likely you’ll need to change things around in the future. These systems are flexible, accommodating changes in site layout and keeping things working reliably in what’s often a dynamic environment.
Why use bump strips? The safety rationale and evidence
Quite simply, the primary purpose of a bump strip is to create a bit of vibration and some noise inside the vehicle when your tyres cross a strip – it’s an effective way to get inattentive or fatigued drivers to pay attention and correct their lane position before it’s too late. By triggering a bit of driver arousal, it lets drivers who are not paying attention get back on track and avoid accidents. And it’s a pretty simple idea that’s been shown to be very effective.
International evidence base
Not surprisingly, the safety evidence for bump strips is pretty solid and consistent across loads of different countries:
Typical crash reduction
| Type | Typical Crash Reduction | Source |
|---|---|---|
| Shoulder/edgeline rumble strips | 10-40% for run-off-road crashes | FHWA multi-state studies, German motorway research |
| Centreline rumble strips | 14% overall injury crashes, 25% frontal/sideswipe | US seven-state study (210 miles) |
| Transverse approach strips | 35-80% at hazard locations | International case studies including Ghana |
| Speed reduction from transverse strips | 2-8 mph on approaches | Various international sources |
| In Germany for example, they found milled shoulder rumble strips reduced single-vehicle run-off-road crashes by around 43%. In Sweden, they found centreline rumble strips reduced single-vehicle crashes and injuries by 20-27% on rural roads. |
Relevance to UK collision patterns
Rural single carriageway A-roads in the UK carry a big share of the killed and seriously injured casualties. Loss of control, run-off-road crashes and head-on collisions account for a lot of the deaths, and TRL’s “Safer Verges” report found that some single carriageway sections could avoid at least one serious injury per mile per year with robust edge and centreline bump strips.
The UK Road Safety Foundation’s iRAP toolkit also confirms that bump strips are one of the best value-for-money interventions for road safety, with a 10-25% casualty reduction for run-off-road and head-on crashes.
How bump strips affect driver behaviour
Well the mechanism is pretty simple. The instant tactile and auditory feedback for drowsy drivers creates a bit of a “micro-wake” effect – even drivers who are not fully asleep experience a bit of arousal when their vehicle crosses a bump strip, which prompts them to pay attention to their lane position. For distracted drivers, the sudden vibration provides a pretty clear prompt to get back to looking at the road.
On approaches to hazards, transverse bump strips build anticipation and increase hazard perception. The increasing pattern of bars signals to drivers that something requiring attention is up ahead, even before the signs start to appear. It is worth noting though that the form of accidents can change over time, with different patterns emerging – so it’s really important to keep up with these evolving forms if we want to be effective at safety analysis and prevention.
Cost-effectiveness
Bump strips time and time again top the list of the best bang for your buck when it comes to highway safety ratings. Compared to big changes to road geometry, barriers or resurfacing, the upfront cost of installing bump strips is pretty low. And when you look at the safety benefits over a ten to twenty year period, the payback is substantial.
The way you get safety improvements like bump strips is by doing a cost-benefit analysis. However, what happens is that safety gets better and as that happens its only the really big crashes that are costing the most – that’s where you start to see diminishing returns on further safety measures.
Things to consider
Bump strips aren’t a catch-all for every crash cause – they won’t stop drivers who are way over the limit or those who are driving recklessly for their own fun. They won’t control speed either like some vertical things do. And let’s be honest – if a driver is tired, even the bump strip is only going to wake them up for a little bit before they start drifting off again.
You have to also keep in mind that the more safety measures you put in, the more each one is going to give you less benefit. It’s the law of diminishing returns.
What kinds of bump strips are used in the UK
Continuous Shoulder and Edgeline Bump strips
These are the strips that run along the edge of the road parallel to the white line on the hard shoulder of motorways and dual carriageways. They’re typically milled into the verge side and are designed to warn drivers when their vehicle is drifting towards the edge.
On a lot of the M1 and A1 you’ll see these strips running along the edge of the road. They are narrow, run parallel to the white line and are only about 10-12mm deep – just deep enough to give a clear warning before the tyres hit the edge of the road.
Centreline Bump strips
These are the strips that get put in the middle of single carriageway roads to try and stop head-on and side swipe collisions. If a driver drifts across into the oncoming lane the bump strip gives them a quick warning before they cross into another lane.
International evidence shows that these strips can reduce crashes by about 14% overall with even bigger reductions for the really serious crashes. And if you put them on rural roads where the lanes are narrow and the drivers are going a bit too quick, they can really help cut down on head on crashes – though you have to be careful about where you put them because the width of the road can limit where you can put them.
Transverse Bump strips
These are the strips that run across the road, and they typically get put in places like roundabouts, village entrance and pedestrian crossings. They’re designed to give a warning when you’re getting close to a hazard.
In the UK we tend to use thermoplastic ribs or high build paint to make these strips, rather than milled paint across the whole road surface. This is because it’s a lot less hassle to install and to take up if the circumstances change.
Surface Mounted Bump strip systems
These are the strips that are glued or clipped into place, and they’re a growing part of the market in the UK. They’re quick to install and don’t require any mowing or milling, which is a bonus for urban areas, car parks and other places where you don’t want to do too much damage.
They’re great for places like retail parks and private estates where you might need to move the layout around, and because you can reposition them you can deal with changes in the site much more easily.
Virtual and Acoustic Road markings
These are the raised lines that are used in noise sensitive areas to give a warning to drivers without making too much noise. They’re a compromise between raised markings and a proper quiet road surface, and you can still get a good tactile warning without waking up the whole village.
Non-Highway Bump strips (brief background)
In industrial settings they use similar products to keep people safe – bump strips on doors, AGVs and dock levellers. They’re also used on gates and moving parts to prevent accidents and keep things running smoothly. While the standards are different from highway, the principle is the same.
Bump strips – a sacrificial barrier for overhead doors and shutters
Bumper strips are put in place to prevent damage to your overhead doors & shutters by sealing gaps & keeping out dirt and draughts. This helps to keep the area clean and dry. They are easy to install with a clip-on system that doesn’t need any mechanical fixings & have a low friction seal that won’t get in the way of your doors moving. This makes them perfect for commercial and industrial places like offices and warehouses.
How Bump Strips Work – accident dynamics & driver behaviour
Bump strips have to be designed to work with real life driver behaviour, not some idealised model. Their benefit from the strip really does depend on the situation, road layout, how familiar the driver is with the road and how much room they have if they do lose control.
Types of accidents Bumper Strips target
Bumper Strips are designed to help prevent :
- Crashing off the road – caused by drivers being distracted, tired or not paying attention
- Drivers losing track of where they are in their lane – leading to head on or sideswipe crashes on single carriageway roads
- Drivers coming in too fast and not stopping – at junctions, roundabouts and road works where drivers are supposed to slow down
Driver behaviour and inattention
Most of the time when a driver drifts out of their lane its because they are tired or distracted for a minute. Long straight stretches of road can cause drivers to get drowsy without even realising it and anything that distracts them just makes the problem worse. Research has shown that bumper strips can help a driver snap back into attention but only for a short time – after that they can easily start drifting again.
The risks of “prevented” crashes
Some research has suggested that even though a bumper strip might stop a crash from happening – the driver might just end up crashing somewhere else later. This “accident migration” is a bit tricky to measure but its something that designers need to consider when deciding what to implement.
Designing bumpers to avoid accidents
One big concern is if a driver hits a bump strip and swerves back into the road – they might end up crashing. This is especially true on roads with narrow verges or steep embankments. Good design can help mitigate this risk. On narrow roads or roads with lots of obstacles near the road, the safety benefits of a bumper strip might be less than on roads with a bit more room to move.
Things to consider when designing a bumper strip scheme
- How people react to the bump strip – people who use a certain road a lot get used to the bump strip and stop paying attention to it, while tourists might still get a fright when they hit it
- Night and day time driving – the problem of tired drivers at night is different from inattention during the day
- People get used to bumper strips on their daily commute – after a while the novelty of the bump strip wears off
- **If a bump strip is too loud it can cause community objections which can lead to the strip being removed or modified
UK Design Standards and Guidance for Bumper Strips
UK designers should have a look at a few key documents when specifying bumper strips:
- The Design Manual for Roads and Bridges – covers road layout, safety features and road surface
- Traffic Signs Regulations and General Directions – information on road markings that might be put over or next to bump strips
- The Traffic Signs Manual – detailed guidance on rumble devices and how to sign them
- Manual for Streets and Manual for Streets 2 – useful for designing bumpers in urban areas
- TRL “Safer Verges” Report – UK-specific research and recommendations for single carriageway roads
Designing a good bumper strip
Here are some typical design parameters for milled rumble strips on high speed roads :
| Parameter | Typical Range | Notes |
|---|---|---|
| Width (longitudinal) | 150-200mm | Along direction of travel |
| Length (transverse) | 300-400mm | Across direction of travel |
| Depth | 8-15mm | Deeper = more noise/vibration |
| Spacing between grooves | 300-500mm | Varies by design intent |
| Offset from edgeline | Variable | Maintain structural integrity |
| Transverse approach strips typically use 3-6 bars with spacing decreasing from approximately 3-5 metres at the first bar down to 1-2 metres at the final bar before the hazard. |
What material you should use for a bumper strip
The material you choose for a bumper strip will affect how well it does its job and how long it lasts :
- Hot rolled asphalt: used a lot in the past but getting less popular
- Stone mastic asphalt : good for strategic roads but be careful when milling so it doesn’t get all loose
- Thin surface course systems: different behaviours when you mill them, you need to check with the manufacturer
- Thermoplastic ribbed markings – Less intrusive to install than being forced to mill the surface
- Pre-formed modular units. These are just bonded to the existing surface and dont require cutting
Cyclist and vulnerable road user requirements
You’ll need to make sure that bike riders have at least 1.0 to 1.5 meters clear “rideable” space – the area right next to the rumble strip and verge edge or kerb – wherever it’s practical to do so. If you can only fit a smaller gap, designs that are a bit more bike-friendly – slightly shallower and narrower, with some gaps in the middle – can help make it safer for riders to get through.
Motorcyclists need special consideration, though. They might have stability problems if they’re approaching the grooves at a tight angle or braking hard, especially in wet weather.
Noise and environmental constraints
Local councils in the UK will often stop using bump devices near houses because of the noise disturbance. You can see this policy in Derbyshire’s environmental code of practice.
Where noise is an issue, you might be able to get away with shallower profiles, different shapes, or even surface-mounted modular systems that are designed to make less noise.
Standard detail description
A typical milled edgeline rumble strip in the UK is specified like this: you cut a series of grooves into the asphalt, about 10-12mm deep and 150-180mm wide, spaced about 300mm in from the edgeline. Then you put in a white edgeline marking either over or next to the milled part, depending on the Tsrgd rules. And after you’ve finished installing, you double-check that the grooves are the right depth and not collecting water.

Designing bump strips for specific UK applications
Motorways and high-speed dual carriageways
At 70 mph, you’ve got to have both shoulder and edgeline bump strips to stop drivers from falling asleep and causing a crash – or getting onto the wrong side of the road. The M6, M1 and A1(M) all have long stretches where you see this type of rumble strip.
But then you’ve got the smart motorways, where you’ve got to worry about drivers using the hard shoulder as a live lane. That means you can’t just have normal shoulder bump strips in those bits – you need to think about the variable message signs and the places where people can pull over.
Rural single carriageway A-roads
These roads are where the 60 mph national speed limit applies. If you put in a centreline strip, you can reduce the risk of people crashing head-on. But if you put in shoulder strips, you might push cyclists into the road, which is a whole new hazard. So you’ve got to weigh up the risks and see if bump strips are worth it.
Approaches to junctions, roundabouts and crossings
You can use transverse bump strips to give drivers a warning before they get to a decision point, especially if it’s a busy area. And if you’re doing a gateway feature – like a village name plate or a painted speed limit sign – you can tie the rumble strip in with that to make it more effective.
It’s especially useful where there are a lot of accidents or people are having trouble seeing what’s happening. There’s a good example of this on the A452 Kenilworth Road near Balsall Common.
Road works and temporary traffic management
If you’re doing road works you can use removable transverse bump strips to reinforce the speed limit. They need to be easy to put in and take out again, last for a while, and not cause too much damage when you take them up.
Temporary jobs like this usually accept being less durable in return for being quicker to put in.
Urban streets, retail parks and private estates
In low-speed areas (about 10-30 mph) you can use surface-mounted modular strips to highlight crossings, loading bays and other important areas. These strips can be changed up and down easily to match the changing layout of the area.
Industrial and logistics environments
Gates, dock levellers, and other bits of internal road all benefit from having warning strips in place. It’s normal for these areas to have their own special rules about how to design things, but often specifiers like to follow the same basic warning principles all over the site.
Installation methods, construction and performance
If you get the installation right, and look after the strip properly afterwards, you can get good durability out of it – even in the UK’s freezing weather with all the salt and de-icing going on.
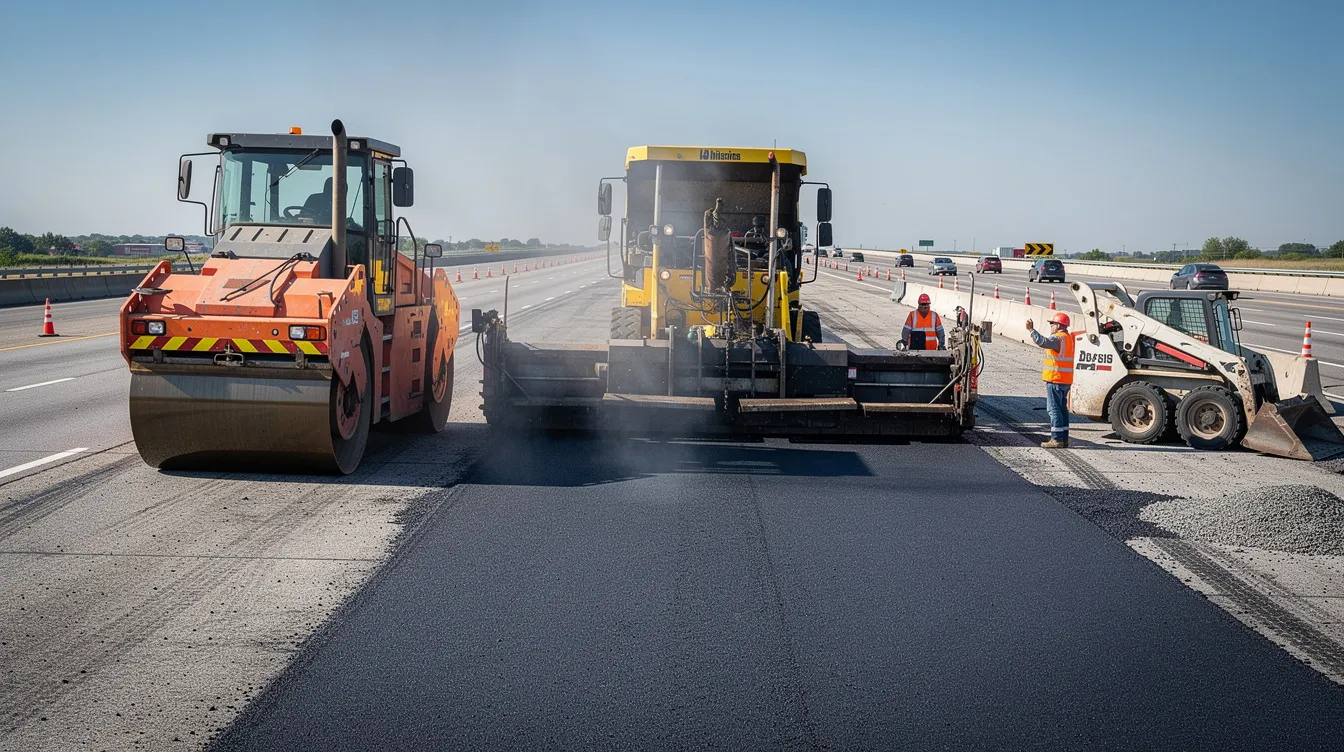
Milled rumble strip installation
Installation is a bit of a process, so you need to follow it in order:
- Survey and design: Check over the road surface to see if there are any problems, and work out what you can and can’t do
- Layout setting-out: Lay out where the grooves will go, and make sure you’ve got all the information you need
- Milling: Specialised machines cut out the grooves
- Cleaning up: Get rid of the debris and check that the grooves are going in the right depth
- Marking reinstatement: Put the edgeline or centreline markings back in place as needed
- Final inspection: Double-check that everything’s working as it should
- Be very careful about laying down on surfaces that are cracked or pretty weak – it can quickly make things worse
Ribbed thermoplastic & high-build markings
You’ll still see lots of approaches where thermoplastic ribs get laid over the top of existing markings, even if full milling is not justified. While it’s not too complicated to do, you do need to pay close attention to:
- The surface temperature – you’ll need to make sure its warm enough for the adhesives to stick
- Moisture conditions – needs to be a dry surface
- Curing time before traffic can be put back on it
- Managing traffic while all this is going on
Installing surface-mounted modular units
It works like this:
- Get the surface ready (clean it up, maybe give it a primer if thats needed)
- Stick down the adhesive (you want a fast-cure sort that works in our UK weather)
- Position the thing, press it into place
- Leave it to set for a bit (anywhere from an hour to 4 hours, depending on the product)
- Then you can let traffic go back over it
But it has some real advantages – its super quiet to do, you don’t need to mess with the pavement, it opens up to traffic way fast, and if one of the units gets damaged, you can just swap it out.
Dealing with drainage & debris
Milled strips can gather stuff like ice, slush, sand, and all the salt – that’s especially bad on centre lines in the winter. You need to make sure the design doesn’t make a big channel for water to run in. We might need to go check on it regularly and give it a clean on the busier routes.
Thinking about maintenance plans
We should:
- Go round all the strategic routes, checking its all still in good nick about once a year (or whenever we’re doing the regular safety checks)
- We need to know what we’re looking for when we go round – loss of profile depth, spalling, cracking, noise complaints, cyclists getting worried
- When we do resurface, we should make a plan for what to do with the bump strips – should we leave them, re-cut them, move them somewhere else?
How its all going to end up costing over time
You need to think about the long game when you’re deciding between milling & modular – with mill milled grooves you will have to rip them all out and start again when you resurface, whereas with the modular things you might be able to just lift the old ones up and stick the new ones down.
How bumps strips are affecting performance, risk, the community & ways to mitigate
Bump strips are all about keeping people safe, but – they have their downsides too. Authorities have to think carefully about how they use them. In some cases we’ve even had to think about removing them because of the noise or because we think they’re making things worse for cyclists
Noise & community impact
The idea is that the bump strips are meant to get drivers to notice they’re crossing a line, but what it ends up doing is making a right racket that goes into people’s houses. We get loads of complaints when we put them in beside houses – especially when the traffic is going slow through villages and then suddenly makes everyone jump as they hit the bump strip.
We can try and limit how many we put in near houses (some places say 200m is a good rule), we can make them not go as deep, or we can just not put them where drivers will run over them all the time
Cyclists and motorcyclists
You can end up forcing cyclists into the live lane if the bump strips go right across the narrow shoulder – it replaces one hazard with another. Our guidance says we need to make sure there’s a proper bit of space so they can get out of the way.
Motorcyclists have a bit of a problem with them too – they can really struggle to keep their balance when they’re braking or cornering over the milled grooves. A lot of the riders will just get used to it & be fine, but the ones who aren’t so experienced might get caught out.
Pavement deterioration
If you’re milled them over a weak spot in the pavement, it can make things worse. And its the same with the de-icing salt – it gets stuck in the grooves and then freezes and thaws and makes even more work for the maintenance team.
Wildlife attraction
We had a case where deer started to get drawn to the salt in the deeper grooves over in the States. While its not a problem for us because we use different salt, we should be thinking about it when we go over wildlife corridors
Crash migration and severity
While bump strips stop some run-off-road crashes, the ones that do happen on the narrower roads might be worse because there’s less room to recover. We need to take a look at the data for our specific scheme before we make a decision about whether to use them.
Talking to the community
Some places have had to take out or modify the bump strips because people were getting so worked up about them. We should try the following:
- Have a trial run before we go all in
- Go and talk to the local folk before we start\
- Keep an eye on how things are going after we’ve put them in and be willing to change things if they’re causing more problems than they solveDevelopment continues on quieter bump strips that feel right under your hands, while not being too bothersome in terms of noise. High-visibility, high-friction modules – similar to those unit systems called Quicksetts – get deployed pretty quickly for trials , high-risk spots that need some temporary action, and sites that need to be pretty flexible.
Some interesting research out of Sweden is showing us that some pretty innovative designs can really maintain safety while also making the communities happy.
Targeted, data-driven deployment for a safer road
Using a lot of collision data, machine learning, and risk mapping lets us target those links where distracted driving is a real problem. Rather than slapping bump strips on every single road, we’re using the data to figure out which spots really need them.
Combining that with other safety plans like speed management and road treatments like signage, lining, and road surfacing is like having a whole safety system rather than just a bunch of separate bits.
Sensitivity to the place and design
When it comes to urban areas and town centres, we really need to mix and match the old bump strips with modern ideas around public spaces, pedestrians and cycle lanes. If you’ve got a highway-style rumble strip in a town centre its going to clash with the design they are trying to create.
Gentle rumble strips near schools or bus stops, or in areas where people are sharing the road show how you can still have safety without completely ruining the character of the place.
Future proofing and the stuff we still don’t really know
UK guidance needs to get updated, here are a few areas where this could be useful:
- we need to be more explicit about the space we need to leave for bike paths
- profiles for bump strips should be more clearly linked to the speed you are travelling at
- There is still work to be done in standardising how we measure the noise bump strips make
- and really getting them written into the official guide for road building with proper dimensions
The current and upcoming research from various places including UK Highway authorities, the Scottish transport people, some of the professional bodies and Universities will help us figure out how to make is safer.
Conclusion
Bump strips, despite sounding like a simple thing, are still one of the most cost effective safety things we’ve got for our UK roads. And the evidence just keeps piling up that well designed and fitted bump strips can really cut down on the number of accidents in areas where drivers are not paying attention.
Whether its on a motorway, a village entrance, a warehouse or a building site, the simple warning trumpets can be a practical thing to have against accidents caused by distracted driving.
Its not just about chucking in some bump strips though – you need to match the right one to the job in hand. Milled rumble strips are good for high speed roads, surface mounted ones like Quicksetts are better suited for towns and places which might need to change in the future. Thermoplastic strips can be a compromise when you can’t get the heavy machinery in.
For those looking to make safety improvements UK engineers and planners can benefit from a ‘safe systems’ approach – combining the very latest design thinking, really good data, good materials and the local community getting involved.
For the techies, for a more detailed look at the modular systems available for roads, estates and industrial estates, talk to the suppliers who know the stuff and can tell you what will best suit your needs.